Showing posts with label Cards: Birthday. Show all posts

At This Age... Birthday Card

This is a card that I found in Cricut Design Space and I loved it so much, I had to make one for my brother-in-law. I added lines that were drawn with a Cricut pen at the bottom and used foam tape to adhere grandpa to the card. If you'd like to try making one of your own, click on the link below:

Old Many Birthday Card Cricut Design Space Project


Cricut 21st Birthday Cake Explosion Box

Cricut 21st Birthday Cake Explosion Box - dianasdesignsca
 
Continuing with my recent obsession with the Birthday Cake Explosion Box, I am sharing one that I made for a 21st birthday. I replaced the single candle with a 21-shaped candle and added extra bling using adhesive rhinestones. Check out my project on Cricut Design Space: 21st Birthday Cake Explosion Box.

Cricut 21st Birthday Cake Explosion Box - dianasdesignsca

Cricut Birthday Cake Explosion Box

Cricut Birthday Cake Explosion Box - Teal
Last week, I tried my hand at the Cricut Birthday Cake Explosion Box project I bookmarked on Design Space many years ago. I loved it so much, I had to make another one! I modified the project by replacing the square and triangular cuts that had cut out patterns with design paper and I really love the look of it. 

Cricut Birthday Cake Explosion Box - Teal

I also added a personalized sentiment to the front of the box and adhered it with foam tape to give it some dimension.

Paper Pups Tube Dog Birthday Card #CricutMade

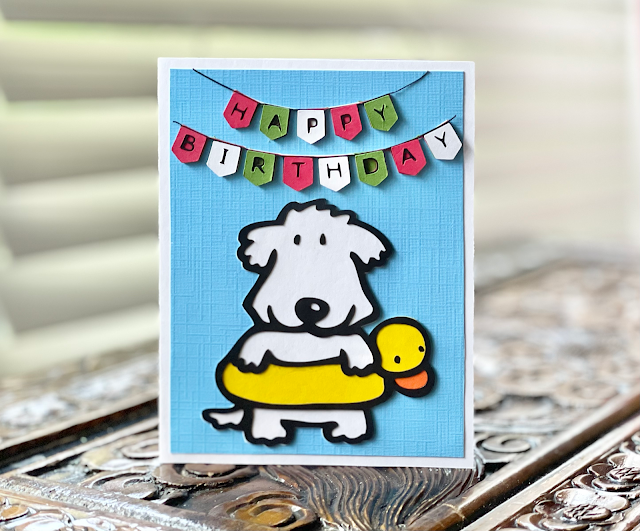
Paper Pups Tube Dog Birthday Card #CricutMade

Of all the old Cricut cartridges I ever purchased for my Expression, the Paper Pups cartridge was among my favourites. I used the tube dog for this birthday card that I had made for my goddaughter, who is a synchronized swimmer. I used the contour and offset features in Design Space to isolate the yellow tube and orange beak.

Peppa Pig Personalized Birthday Card with Matching Envelope

Peppa Pig Personalized Birthday Card with Matching Envelope

I'm back! I won't even say how long it's been since I've posted here on my craft blog. But I absolutely love how my latest Cricut creation turned out, I simply had to share. I'll keep this post short and sweet, though. Using the Cricut Design Space, I used the print and cut feature and created a layered cutout of Peppa Pig using foam tape from the dollar store. The sun is from the Paper Doll Dress-Up cartridge but I removed the eyes and mouth. The font was a little too small but I ended up using it anyway, despite it being a slight challenge to adhere using my Zig two-way glue pen. The flowers were cut out with a punch and then I added self-adhesive rhinestones from the dollar store.

Cricut Create a Critter Bunny Card

Cricut Create a Critter Bunny Card

Taking inspiration from an adorable bunny gift bag, I decided to make a bunny themed birthday card for my BFF's daughter. I used the bunny cut from the Cricut Create a Critter cartridge and added a circle frame to it using the Design Studio. As usual, I stuck with a standard A2 card size, so the bunny itself is about 2". I couldn't figure out how to crop the bunny to fit the circle using the Design Studio so I just cut off the lower parts after I adhered it to the circle.

Create a Critter Squirrel Birthday Card

Create a Critter Squirrel Birthday Card

I'm baaaack!

I know it's been a long time since I last posted, way too long. The truth is I haven't been crafting as much as I used to. I've been lacking the inspiration, the time and the patience as of late. But I recently took advantage of an Amazon Prime Day deal and I bought a Cricut Expore Air 2. Since then, I have made a handful of crafts and I am eager to get back in to crafting regularly. Today I share the first card I made using my new machine. It's a birthday card in a standard A4 size. The squirrel is from the Cricut Create a Critter cartridge and it's about 3". I removed a couple of contours using the Design Space contours feature to hide the eyes, nose and mouth since I wanted to hand draw the face. The grosgrain ribbon is from a box of chocolates I was given by one of my students. I used foam dimensional dots from the dollar store to adhere the critter to the card front. Isn't this squirrel a cutie?

Cricut Create a Critter Dalmatian Invitations

Cricut Create a Critter Dalmatian Invitations

My nephew's first birthday is coming up this summer and my sister-in-law asked if I could make some invitations for her. I had made Cricut Create a Critter Owl invitations for her first-born so of course I was going to make some for her second. She ended up choosing the dalmatian from the same cartridge and it was perfect since the fireman's hat has the number 1 on it. I wanted to try my hand at a shape card since I hadn't made one in a while.

Cricut Paper Pups Birthday Card - Pink


A few weeks ago, my goddaughter turned ten years old. Yes, she's a whole decade old. And that's a pretty big deal in my books. For her birthday card, I chose to go with a pink polka dot theme. Her family has two cats at home and I know how much they love animals so I chose to use a puppy dog cut from the Cricut Paper Pups cartridge. I kind of wish they had a Paper Kittens cart, too, but the paper pup would have to do. I really like this cut since it has an optional bow. If I ever use this cut to make a card for a boy, I can easily use it as a bow tie. Cute, no?


The pup was cut at 2.5" and adhered using pop dots. I also added a self-adhesive rhinestone to the bow and corners for a 'bling' effect. The pink polka dotted designer paper is from the K & Company Valentine pack and the ribbon is from an old stash I bought at Michael's. I also used my Martha Stewart butterfly punch to embellish the inside of the card as well as the envelope.


The sentiment is from Stampin' Up! and I used dimensional foam dots to make it pop out. It's a simple card but my goddaughter seemed to really like it.

Butterflies and Flowers Birthday Card


For this birthday card, I used my cherished Martha Stewart butterfly punch that I found at Walmart to cut out two butterflies and glued them together at the body. I also curved the top set of wings slightly. The flower is from a Recollections Signatures set and the sentiment is a stamp from Stampin' Up! I used a purple brad to attach the flower and pop dots from the dollar store to adhere the central matte.


Handmade Paper Pups Birthday Card


Making a masculin-looking card has never been easy. I always struggle with the colour combinations and motif. It could be that my current stock of art supplies is filled with bright colours and floral patterns. In any case, I often resort to muted or neutral colours when it comes to making cards for males. For this card, I chose two design paper patterns from the SEI Charlemagne paper pad and added re-purposed ribbon. I used a bunch of cuts from the Cricut Paper Pups cartridge and kept them black and white. The sentiment is also a cut from the same cartridge.


Handmade Star Birthday Card


Earlier this month, my dad celebrated his sixty-somethingth birthday. You know, the one that creeps ever so close to seventy. Even though he's retired and spends his well-earned retirement days at home, he is still an all-star in my eyes. He came to Canada with a couple hundred bucks in his pocket, a single piece of luggage and yet not a word of English in his lexicon. But still he managed to find good, honest work, save money for a house, start his own business, and raise three very smart children. It only seemed fitting to make him an all-star birthday card. I used the star cut from the Cricut Plantin Schoolbook cartridge cut in 4 different sizes. I glued two sets of two stars together using a Zig two-way glue pen and then used adhesive foam to the layers to make the star stand out. The pattern paper is from the Recollections Bold Basics paper pad and the cardstock used for the base is from Stampin' Up! as is the sentiment. 


Handmade Floral Birthday Card Using EK Daisy Scallop Edger Punch


Over the weekend, I made a couple of birthday cards - one at the request of a co-worker and one to give to my French teaching partner who celebrated her birthday yesterday. I came across this colour combo from the Color Throwdown challenge and I really like how nicely they come together. I also used my brand new EK Daisy Scallop Edger Punch which I received courtesy of DeSerres. I used an underlying layer beneath the border in a solid colour to make the border pop as well as a strip of pattern paper on the inside of the card. I then added some ribbon, Recollections floral embellishments, and an adhesive gem from the dollar store. The sentiment is a stamp I found at the dollar star as well.

Personalized Smurfette Birthday Card


While rummaging through some of my old photos, I came across this personalized Smurfette birthday card I had made last year. I found an image of Smurfette online and made several copies of her. Then I carefully cut out each one. Starting with the bottom layer, I cut off portions of the cartoon until I eventually ended up with just her hat as the fourth layer. Using foam dots to add depth, I put the layers together before adhering the cutout to the card. The letters have two layers with a white shadow, which I cut using the Cricut Pooh Font cartridge. I like the bunch of flowers I attached using brads but am still unhappy with the general layout of the card. I find that often happens when I make cards larger than an A2. Too much space to fill up! Anyway, I recently decluttered my Cricut/craft space so I'm hoping to work on some more cards in the coming weeks. Stay tuned!


Personalized Birthday Card with Cow


The requests for personalized cards this year kept adding up. This one was definitely fun to make, though. I used the adorable cow and grass cuts from the Cricut Paper Doll Dress Up cartridge. This card is very similar to the Moochas Grassias cards I made a few years ago. The cow is cut out at 4" and I printed the sentiment using my computer. I adhered the cow using some foam adhesive to give him some dimension and cut out the black spots free-hand. I also inked the edges of the grass as well.


Personalized Ladybug Birthday Card


Here is another personalized birthday card I made at the request of a co-worker. I used the ladybug from the Cricut Doodlecharms cartridge and I believe it was cut at 3". I added an extra layer of wings and attached it using adhesive foam to give the wings a 3D appearance. The font is from the Cricut Storybook cartridge and I alternated the sizes between 2" and 1.25". I really like the look of the alternating sizes so I'm pretty sure I'll be trying it out again in the future. The design paper is from a K&Company Valentine pack I purchased at Michaels.


Personalized Birthday Card with Flower


Sometimes, when you're pressed for time, a simple personalized birthday card will have to do. For this card, I fancied it up a bit by using the Fancy feature on the Cricut Storybook font cartridge for the first initial and smaller letters in the basic font. I really like how it turned out. The card fits a standard A2 envelope and the font is about 1.25" and 2". I used a Prima flower with a purple brad along with some adhesive jewels. I rounded the corners using a corner punch and reused some old ribbon.


Stampin' Up! Spring Surprise Bundle


(Originally published on Toronto Teacher Mom.)


On the weekend, the weather was so cold that we had to turn the heat back on. While Mother Nature may have a hard time understanding that it is spring, Stampin' Up! knows full well that it's the perfect time to celebrate the season of May flowers with their Spring Surprise Bundle, coordinating inks and card stock in bright colours. Stampin' Up! sent me a sample of the bundle that features the Round Array stamp set (available in clear-mount only) and the coordinating Scallop Circle 7/8" punch featured above. The stamp set includes five stamps with sentiments and three generic stamps that are perfect for everyday embellishments.


The Stampin' Up! Spring Surprise Bundle is a perfect set for those looking to incorporate stamping into their crafts as it includes all the elements required to complete a project. With these stamps and coordinating punch, you can easily embellish a variety of projects, like cards, notes, jars of homemade goodies, and more!


Since I love to make greeting cards, I chose to use some Stampin' Up! card stock in Primrose Petal and Raspberry Ripple with coordinating water-based dye ink to create a couple of birthday cards which measure at 5.5" by 4.25". I stamped and punched two of the same images and attached them using a dimensional to add some pop.


I loved using the stamps and coordinating punch so much that I decided to embellish the inside of the cards as well. I seriously need to look into getting more coordinating stamp and punch sets...

Personalized Birthday Card with Monkey Magnet


This past weekend, my son celebrated his fifth birthday. He's such a little monkey that I decided to use the monkey cut (at 4") from the Cricut Create a Critter cartridge to make a personalized birthday card for my parents to give to him. I used three colours of card stock: dark brown for the base layer, a sort of tan colour for the second layer and a lighter brown for the topmost layer. I then rubbed some brown ink along the edges of the cut.


I used the Cricut Pooh marker font to cut out his name in dark brown and used a white shadow, cut at 1". 

I added some adhesive pearls and the vine cut from the Create a Critter cart. I only glued the ends of the vine because I wanted to be able to hang the monkey from it. The reason being is that I adhered a piece of magnet onto the back of the monkey so my son could have his own unique magnet. Isn't it cute?


Paper Pups Birthday Card


Using some Stampin' Up! card stock in kraft as well as some designer paper from the DCWV Green Tea Paper Stack and recycled ribbon, I made this birthday card at the request of my teaching partner whose husband recently celebrated his birthday. She loves dogs and seems to really like the cards I have made in the past using the Cricut Paper Pups card, so I went with the "relax" pup. Isn't he a cutie?